
My construction company loves PLS laser levels. We own three of them: one PLS 2 and two PLS 5’s. The PLS 2 was purchased used around 2010, and a label under the controls shows the date code as “2/07” so I assume that is when it was made.
Toward the end of 2012, the level stopped working. The laser lit up just fine, but the self-leveling function was out of whack. It gathered dust in my shop until last week, when I decided to get it fixed or replaced. It so happens that PLS headquarters are not far from me, so I figured I would drop by to see what could be done. The receptionist informed me that these older models do not get repaired (apparently only the rotary models can be serviced), but she mentioned I could exchange my old one for the latest version, and at an appreciable discount. That would still mean around $200 plus tax; I replied I would think about it.
Back at the shop, I decided to disassemble the level to see what was wrong. I figured the issue was more likely to be mechanical than electronic, so why not check under the hood?
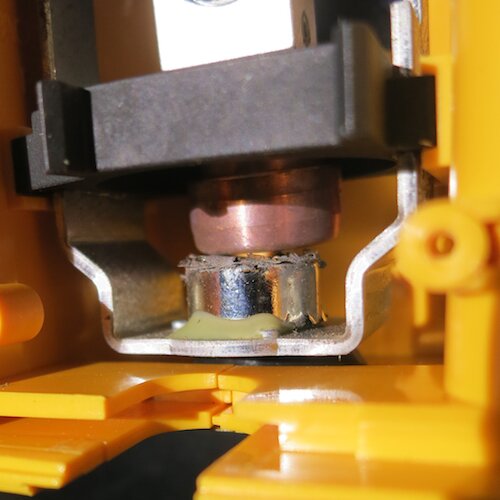
I was glad I did. After I disassembled it, the problem became visible immediately. With the level standing upright, you will see a round magnet at the bottom. I suppose it used to be covered entirely with a thin layer of shiny metal, and this layer had completely deteriorated at the top of the magnet. Now, the bottom of the pendulum (the copper-colored part), which sits right above the magnet with very little clearance, can no longer swing freely, as it is obstructed by metal fragments.
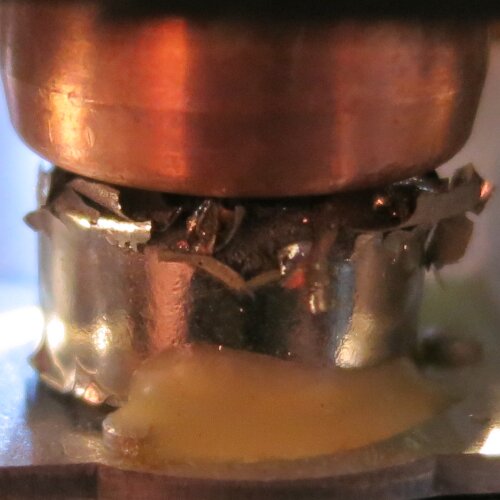
With a pair of Uncle Bill’s tweezers and a thin-bladed knife, I removed as many of the fragments as I could. Keep in mind that the magnet is powerful, making removal with metal tools a little challenging. Remember, too, that these fragments do not mix with the electronics inside the unit. It might be a good idea to hold a vacuum cleaner nozzle right above, so fragments will be removed rather than dispersed. In any case, in less than twenty minutes the PLS 2 was back in business. Total cost: $6.49 for a specialty screwdriver.
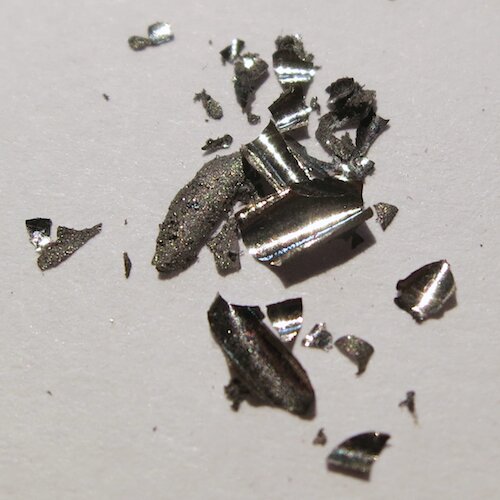
I believe this delamination problem is not a matter of wear and tear, but a defect in design and/or manufacturing. It is my impression that Pacific Laser Systems is a reputable company that cares about its customers. If your PSL 2 acts like what I described here, give them a call and see what they can do for you. Please leave a note below about the result.
If you decide to take the PSL apart:
- Remove the back cover and take out the batteries
- Use a T6x40 screwdriver to remove the four screws
- Carefully pull the housing apart. Be mindful of three thin copper wires that connect one side of the housing to the other
- Turn the unit so the front (where the lens is) faces down
- Pull up and out the brass thread mount
- With small needle-nosed pliers, gently pull the metal frame upwards. The black rubber gaskets are all that keep it in place.
- As always, do this at your own risk. Your warranty, if you have one, will most likely be toast.

When you look online, you will find a TON of articles and videos about how to get rid of wallpaper. This video was published before and shows how to remove it. Some people recommend chemicals, others use vinegar or hot water, and some love using a steamer. What is noteworthy is that for every success story there is a tale of failure and frustration. Why?
The answer is simple: there are different kinds of wallpaper! Some are fairly thin, and come down as entire sheets faster than you can say “I love chocolate.” Others are made of thick, designer-type paper that will not come off no matter how much you soak, spray, or steam. This is what Melinda (featured in video above) and I ran into, and here is how we solved that problem.
We left the second layer of paper on the walls. We carefully inspected all the seams and corners to make sure they were in good shape. If you find any that are not, use some glue to make sure everything stays in place. Remove all nails, screws, and hooks you come across. Mask all surfaces you do not want paint on, and remove cover plates from light switches, electrical outlets, and so forth. Next, using a full-sized roller cover and paint tray, paint all wallpaper with an oil-based, fast-drying sealer. You will want to wear a suitable respirator and open doors and windows for ventilation, as the sealer vapor is toxic. Depending on the wallpaper and how much it absorbs the sealer, you may need to apply a second coat. You will love how this sealer will begin to hide that awful wall covering.
Next, find yourself an experienced drywall finisher. This person will apply drywall tape or mesh to all the seams, and then float these seams with drywall compound, known in the trades as ‘topping.’ In Melinda’s house, we asked the drywall finisher to ‘float’ (or ‘veneer’ or ‘skim coat’) all the walls. This means a thin layer of compound is applied onto the sealed surfaces.
TIP: If you have crown moulding or other trim that has a narrow profile, tell the drywall pro to feather the veneer along the moulding’s edges. If that is not done, the edge of the moulding’s profile will disappear and look strange.
After the skim coat dries, a vacuum sanding system is used to lightly sand it, leaving a beautifully smooth surface, ready to paint. Or, instead of the veneer, you can have the walls textured. This will be cheaper and a bit more forgiving if your walls contain a lot of irregularities.
TIP: Make sure a bright floodlight is used when the veneer is sanded. The light will make imperfections much easier to see. Use of a vacuum system is also important. This type of dust is very fine and will travel *everywhere*. Covering up any furnace vents is a good idea, too.
Now you will be ready to apply a regular, water-based drywall primer. An added benefit of this primer is that, once dry, it allows a much better view of the quality of the drywall finishing work. Look at where the seams were taped. Hold a straight edge across the seams horizontally, and if there are noticeable bumps, ask the finisher to float out that area more. Simply use a pencil and mark the areas that need attention. The extra veneer and drywall primer will cover the pencil marks eventually.
In case you are wondering about the purpose of oil-based sealer, the reason is that the skim coat contains a lot of moisture. To prevent that moisture from weakening the wallpaper adhesive, you will want to apply a barrier between the paper and the veneer.
Do you know of better ways to deal with annoying wallpaper that won’t come off? Please let us know in the comment section!
]]>
Leave it to those Amsterdammers! Famous for their red light district, Old Dutch Masters, and gorgeous canal houses, one is now being built with a 3D printer.
A few weeks ago, Annemarie Coevert of the Dutch newspaper NRC Handelsblad reported how DUS architects designed the world’s first building being constructed with a 3D printer. Visitors can observe the printer, built by the same architecture firm, and nicknamed “de kamermaker” or “roombuilder.” Here continues a rough translation of the article:
The onsite construction trailer has blueprints on display (President Barack Obama visited the site last week), as well as scaled-down 3D versions of each of the house’s 13 rooms, available for purchase. While a Dutch building contractor as well as a German material’s supplier are involved in the construction process, more funding is needed to complete the canal house.
Although it has been decided that the building’s facade will be of similar design as the Cubist style used in Prague over a century ago, many construction details remain unknown. “3D printing is a totally different way of building,” explains Hedwig Heinsman from DUS architects. “Only the shape of the 3D canal house resembles a typical old canal house. For the rest it differs completely from a traditional building.”
According to DUS, the idea behind this project is to come up with new ways to construct buildings efficiently with recyclable materials. The 3D canal house should become a prototype for a building technique to be applied all over the world.
This is exciting! Yes, a great deal needs to be figured out, but the concept of new methods and sustainable materials is something we can not afford to ignore.
Learn more about the canal house.
]]>
Last year, I reviewed two electrical outlet testers: F-Circle’s CircTest 3579-4 for regular, grounded receptacles; and the Commercial Electric MS6860H, which can also be used to test GFCI circuits. The main complaints I voiced were that both were labeled on one side only, making it cumbersome to test receptacles that were installed upside down, and that the CircTest had lens covers that fell off if I grabbed the unit the wrong way.
The Sperry Instruments GFI6302 addresses both these issues. It seems well-built, and features:
- Labels on both sides of the unit
- Lenses that are integrated in such a way that they can not accidentally be pulled off
- Bright neon indicator lights, indicating polarity, hot, neutral, ground, etc.
- Ribbed rubber sides so your fingers get a good grip when removing the outlet tester from a receptacle
- A GFCI button that appears to function correctly, and is located on the top
- A lifetime warranty
- Instructions in English, French, and Spanish.

I can find only one downside, which is the way this tester is packaged. Packaging consists of a plastic blister pack and cardboard. Sperry should follow in the footsteps of so many other manufacturers — Apple and Sandisk, for example — and minimize the use of plastic.
Aside from the blister pack, the GFI6302 is Remodel Blog’s top choice of GFCI outlet testers. I bought a review model at Amazon for $8.95, but immediately afterwards the price went up to $10.89. Still, I think it is worth the money. Happy testing, and please do it safely!
]]>
Around 2004, I bought the best-ever Hitachi 10 inch sliding compound miter saw, model CF10FSB, made in Japan. That saw was one of the awesome-est (!) tools I owned, and so it was with great chagrin when I discovered it stolen from a job site several months ago. Thankfully the thief did not bother taking the deWalt stand. Anyhoo, this post is not about the saw that was stolen but about the saw that replaced it.
Since I was not willing to shell out $700+ to replace the CF10FSB and all I needed was a simple miter saw, I looked at the C10FCE2. For little more than $110 plus tax, and after reading many good reviews, I decided to sign up.

This Hitachi seems like a decent saw. Not as heavy-duty as the beast I lost, but still functional and fairly precise. The cut is not as square as it could be, so I need to do some fine-tuning. I decided to also buy a third-party laser, the Oshlun LG-M01. It installs quite easily, but is not as bright as the stock model that came with my old saw. In direct sunlight you will not be able to see it; however, as long as you are in the shade it should serve you well. Getting a pair of shades designed to see laser lines better may also be helpful. The alignment of the laser line with the left side of the saw blade is perfect.

I mounted the saw to a chunk of plywood to gain a more stable footing. This ply will get bolted to the DeWalt kit that allows it to be mounted on the old DeWalt stand I still have. As an aside, I was working with Smith’s Clear Epoxy Sealer when I received the saw, so I coated the plywood on all sides with this stuff. Should make it last awhile!

The design flaw I referred to earlier is this: when I started making a lot of cuts, I noticed a great deal of saw dust collecting around the saw and hardly any in the dust bag. When I removed the bag and peered into the exhaust port, I saw it was completely plugged up. After I removed all the dust, I saw that the port has a small divider in the center of it. Check out the photo.

I suspect this is a safety feature that prevents larger chunks of material from flying out of the saw when there is no bag installed. At the same time, it seems like a no-brainer that this thing would obstruct the flow of debris, especially if the wood being cut is wet. Long story short, it was clear that the divider’s days were numbered. I jammed a large, flat-bladed screwdriver in there, turned it clockwise until the divider broke. It seems to have been made out of cast aluminum, so breaking it does not take much effort. Ever since then, no more backed-up saw dust, and the dust bag is doing its job. Making this modification will probably void the manufacturer’s warranty; something to consider before you commit Screwdriver Fu on this tool.

The support extension, shown on the left side, I found it too small to be useful. There is no option to slide it under the saw when I am packing up, so each time I have to remove it, or leave it on and deal with greater bulk. You are better off building your own out of some plywood in the shape of an inverted T. Or use a stand that has its own supports. This saw also comes with a clamp, although I never use it. The handle of my old saw included a small, removable button on the left side. It had to be pressed at the same time as the on/off switch before the saw would start, which was a nice safety feature. This new saw does not have that, but hey, what do you want for half the price of an iPhone? The unit is double insulated, so the cord comes with a simple two-prong plug. This is especially handy if your remodel is in an older building that does not have grounded (three-prong) receptacles.
All in all, if you are looking for a basic, affordable compound miter saw from a reputable manufacturer, this is it. Just buy it and be happy. Frankly, I am surprised that something like this can be manufactured, shipped overseas, and sold at a profit for $110. I got mine from Amazon, and they can also be found refurbished at even lower prices, especially when you can get it tax-free and/or with free shipping. At this price, everyone with even the most basic home shop should own one. Good luck, and be sure to get an oil-based marker so you can write your name all over it. I sure did!
]]>
In a couple of weeks, we will start a second floor bathroom remodel in a 1930’s Spanish-style home. We plan to cover this project from A to Z with video and stills, and will share tips and tricks of the trade. Here is a brief description of what will be happening.
We will remove:
- A portion of lath & plaster wall and ceiling
- The entire tiled floor and mortar bed
- ‘Thirsty Throne’, an ancient, water-guzzling toilet
- Old plumbing and knob-and-tube wiring
Then we install:
- New framing to prepare for a dual-flush toilet with in-wall tank
- Blocks to ‘back’ new drywall, towel racks, and so forth
- A super-quiet, low-voltage exhaust fan plus sheetmetal ducts
- A new electrical circuit, GFCI receptacle, and switches
- New recycled cotton insulation
- Cool wallboard that does not contain any paper
- The subfloor, cement board, and ceramic tile
- A brand-spanking new wall-mounted toilet
That just about sums up what is on drawing board right now. You will see the tools that are best for each part of the job, and best of all, you are encouraged to asked questions about what’s going on. Stay tuned!

You would want one, too, if you lived in Sausalito with a beautiful view of the San Francisco Bay. A stroke of luck for my company, several other builders were not willing to deal with steel deck supports. True, steel is far less forgiving than wood, yet that made this an interesting challenge. And who would not love having a job with a view like that?
The reason this 2nd floor deck received steel posts is to keep the view from downstairs windows relatively unobstructed, and to maintain usability of the flagstone porch. Sausalito is located in earthquake country, and had the deck been designed using wood posts, it would necessarily have included an X-shaped brace between them to resist lateral movement. As you can tell from the photo below, this would have impeded the view substantially.

Just so you have an overview of this second story project, we:
- Removed the stairs and garden shed below;
- Replaced the master bedroom window (top left);
- Replaced the bedroom door with a new Marvin door;
- Added a new Marvin door to right of door shown, into the kitchen; and
- Kept the opening at the bottom of the stairs, but filled-in the lower half with a railing.
Preparing For Construction
The owners already had construction drawings made by an engineering firm, so all that was left was to obtain a building permit and get to work.
The single most important preparation was figuring out the height of the tube steel posts, just over 14 feet. This was determined by putting a laser level on the finished floor of the 2nd story master bedroom, and projecting the laser beam at a grade rod, placed on the patio where each support post would be located. The reason this measurement had all of our attention is obvious: if a wooden support is a bit too tall, it can easily be cut. If it’s too short, shimming is always an option. With steel, however, adjustments are a bit more tricky. Once we were satisfied with our work, we verified placement of the posts, and called-in the cavalry.
Pier Drilling
The engineer had established that each pier should be 12 inches in diameter, and about 7 feet deep. They ended up a little deeper than that, based on soil inspections while drilling took place.
Tip:
If your project includes drilling or excavating of any kind, remember to:
- Call 811 or visit Underground Service Alert if your project is located in California. At no charge to you, these friendly folks notify local utility companies who will come out in a jiffy to mark most utilities that may be underground. If you do not call and cause damage, you will be held responsible for repair costs.
- Have plenty of thick plywood around to securely cover any pier holes or other excavations. It is easy for a child or pet to fall into.
- Consider what to do with all that dirt. Where will it go? Can you spread it out around your property? Do you know of someone who needs dirt? Having it hauled away is expensive.

Another Tip:
I highly recommend you insert a sleeve akin to Sonotube to protect your newly drilled holes from caving in. If they do, you can pretty much start all over again, and who wants that?
Lastly, remember that the hydraulic drill rig is powered by a tow-behind compressor. See to it that you have adequate parking space, and make sure there is sufficient clearance for ambulances and fire trucks to pass by. Typically ‘No Parking‘ signs can be obtained from the same authority that issued your building permit. One of our projects required that an entire street be closed to through-traffic. We had to obtain special permits, install road signs days ahead of time, and have extra personnel on hand to re-route traffic.


Photo was taken at different job site, but same hydraulic drill rig was used in Sausalito
Rebar Cages
Once the holes are drilled, you are ready to install rebar cages. Here’s a photo of one used on a different project. This baby is a nearly eleven feet long, as compared to the 7+ feet we used for the 2nd story deck. The latter had a coil design, unlike the one shown.

When rebar is installed right next to dirt, there needs to be a 3 inch space between the two. We ended up tying a bunch of 3″ so-called dobies to the outside of the cage. This helped center the it as we lowered into the freshly drilled holes. (A dobie is a square chunk of cement, measuring 3x3x3 inches in this case. It also has two pieces of tie wire sticking out, so it can be attached to rebar). When determining the diameter of the hole to be drilled, figure as follows: take the engineer’s spec (16″ in our case), then deduct a 3″ clearance on each side of the cage, so the actual cage diameter is 16 minus (2×3) 6= 10″. That 3 inch clearance also applies to the bottom of the cage. Unless you want the whole thing to rust out in a few years, take these clearances seriously and install with care.
If you want to do things fancy, you could have the rebar cages coated to prevent rust. I often see these coatings on CalTrans projects. Anyone in northern California knows where to get this done? I’d be interested. As an aside, here are photos of a huge rebar cage being lowered by a crane, and of note are guiding wheels welded to the outside of the cage. They help center the entire unit while being inserted into the hole. Cool!


Setting J Bolts And Pouring Concrete
As the name implies, J-bolts are bolts shaped like the letter J. The hook at the bottom provides good protection against uplifting motion. These bolts are supposed to be tied to the rebar cage with tie wire, and this entire contraption should be rigid so it won’t move during the concrete pour. Easier said than done. Sure, there are many ways to rig up some lateral supports, but we were faced with another obstacle. One of the pier holes was taking on water, and I really didn’t want to see that.

A garden hose was guided to the bottom of the pier, and connected to a transfer pump. That was all fine and good, but there just wasn’t enough room for the hose plus the cage plus a rig that would keep the j-bolts steady, plus room for the concrete pumping hose. On top of that we also wanted to stick in a vibrator during the pour. All this had to be in place for the building inspector to see, hence my concern. In the end, the J-bolts rig was not secured, and the inspector was grumpy but yet he did not interfere. CVAN Builders did several projects in Sausalito back-to-back, and received many compliments from the local building official. Good relationships with inspectors go a long way. A lonnggg way!
How Much Concrete? What Kind?
There are many calculators on the internet for just this purpose. Once you know how many yards of concrete you will need, add about 10% to what you calculated. The reasons are that:
- When an auger pulls dirt from a hole, it tends to scrape additional dirt off the hole wall, thus requiring more concrete to fill; and
- Once piers are drilled and soil is removed, dirt begins to dry and shrink. This is a minor issue, but some holes do linger due to inspection delays, and so forth.
When you order concrete, you will be asked about the size of rock, slump, sack mix, and PSI. It is outside the scope of this post to delve into these, but gaining familiarity will help you.
Using a concrete vibrator helps eliminate air bubbles, and provides greater density. Don’t keep this tool in one place too long, or you risk gravel sinking to the bottom, and thus decreasing pier strength. Dang! One more… be sure to wrap the threaded part of the J-bolts with duct tape before concrete is poured. The threads will stay clean, making it so much easier to install the nuts.
Oh, before I forget: in many cases you’ll use a subcontractor who provides the concrete pump and hoses. When your pour is done and they get ready to clean up, what will happen to the concrete that’s inside the hoses? For a marginal charge, the left-overs can be pumped back into the concrete truck, and the manufacturer will recycle it. Just remember to add this to your budget.
Lastly, you may be required by the building department to have so-called ‘special inspections’. This means that either the original engineer, or, and more likely, an independent engineer, be present during the pour. He will verify that the work was done according to the construction drawings, and his lab may test the concrete to verify it meets the required strength. Your local building department may also require an ‘observation letter’, signed and stamped by the independent engineer. Special inspections and observation letters can easily add $1,000 or more to your project, so keep it in mind. when making your budget. An independent engineer (aka testing engineer) can be hired only by the client, not by the contractor or architect. This is to prevent any conflict of interest.
Installing Tube Steel Posts
While all the other work was underway, our steel contractor was putting together the posts. He left the base plates for last, so we could make precise measurements of the j-bolt locations after they were installed. A little tweaking of these is possible, but take great care in doing so. The last thing you want to do is compromise structural integrity.

Keep in mind, too, that you will want room for a ratchet or wrench, and you will want the bottom of the nuts to fasten flat agains the top of the base plate. In addition, this plate has welds that attach it to the tube steel, and this takes up some space. I admit I forgot about that until it was pointed out to me; it pays to have great subcontractors. First install nuts that will go below the base plate. Level them out as well as you possible can. Next install the posts, and take care to not bur threads or bend j-bolts. Once in place, fasten the top nuts, hand-tight, and put a 6 foot level along each post. Once you’re good in all directions, tighten all nuts, and fill the space below the base plate with epoxy grout.

Deck Framing
We installed a 6×10 header between the posts. It was made of pressure-treated fir, and since the post buckets were not galvanized steel, we used bitumen tape instead. As long as you install a long-lasting barrier between steel and pressure-treated lumber, you’re good to go. Perpendicular to this beam, we installed a 3x ledger that was attached to the house. Similar to the project I described in ‘Curved Ipe Deck — Photos & Tips‘, we installed deck-to-house spacers to create a break between ledger and siding. All holes into the house framing were pre-drilled and filled with silicone caulk prior to installing galvanized lag screws.
I can quickly think of several scenarios in which a ledger would be attached straight to wall framing, without any deck-to-house spacers. In such cases, order up some GSM flashing. Have it run at least 4 inches up the studs so the wall’s vapor barrier (aka ‘building paper’ will cover it.

One Simpson Tension Tie at each end of the ledger were bolted through the ledger and new blocking in the wall framing with a piece of 5/8″ all-thread, with washer and nuts at each end. After that, framing was conventional. Two-by-six pressure-treated joists fastened with LUS26Z joist hangers (‘Z’ denotes being galvanized). Decking and railing material were all clear heart redwood, which the client unfortunately decided to paint.

Clearances
Deck railings have to be 42 inches high, which can wreak havoc on a nice view once you’re seated at a table. One way around that is to install a cable railing or glass panels. Call your local building department to see if they are allowed. Spindles under the deck railing have to be spaced less than 4 inches apart. For that matter, all spaces that are part of the deck have to adhere to this requirement. Just so little kids don’t get their heads stuck or squeeze through.

Exterior Electrical Receptacle
If you build a deck on a first floor, code requires an electrical receptacle. It should be a GFCI-protected unit, enclosed in appropriate housing. However, on a second story this does not apply. Or so the inspector told us. Call your local building department to make sure they are in agreement.

Hopefully this was of help to you. As always, don’t hesitate to ask questions, no matter how simple. There are other deck projects I want to share, so subscribe to the RSS feed.
Resources
- Deck construction: CVAN Builders
- Design and engineering: Pheif Engineering
- Structural steel: Marin Manufacturing, San Rafael, CA
- Special inspections: Columbia Research & Testing, Windsor, CA
 ]]>
]]>
The walls of my friend Melinda‘s house have several layers of wallpaper. They ain’t pretty, and about a week ago she told me of her plans to get serious. She rented a wallpaper steamer, picked up some supplies, and a day later wallpaper was falling to the floor.
Look around on the web a bit, and you will learn there are several different kinds of wallpaper, such as strippable and traditional. Whereas the strippable can be removed with a water-based chemical like DIF, the traditional type must be taken down with a steamer and good ol’ elbow grease.
Here’s how to do it:
- Rent a heavy-duty steamer, such as the Warner 5687. It runs about $28/day in the San Francisco area, with a deposit varying from $100 to $500.
- Unless you don’t care about the floor, cover it with a tarp. Melinda used Easy Mask Tape & Drape, which has masking tape attached to one end so it’s easy to apply to the top of baseboards. The tarp is thin; use care not to put holes in it.
- Get a wallpaper scraper and a scoring tool.
- Remove cover plates of all electrical receptacles, light switches etc, and make sure the power is shut off. Because of that, you will most likely need an extension cord for the steamer. Use a grounded, 12 gauge cord, and not one of those thin ones; the video explains why. Our steamer had in-line GFCI protection. If yours does not, and if the cord will reach the kitchen or bathroom, plug it into a GFCI outlet for added safety.
- The steamer takes a good half hour to heat up all the water, so fill it with hot water from the tap to speed this up. Wear long pants to protect your legs from the steamer’s hose. It gets hot!
If you have lath and plaster under the wallpaper, you’ll be able to clean it, patch whatever cracks you come across, and paint. If you have drywall, especially unprimed drywall, you will have to prime all surfaces before you can apply a skim coat of drywall compound. I recommend that you leave the skim coat to a drywall professional, as it takes some experience to produce an even, smooth surface. Texturing is more forgiving.
Should the plaster be damaged and/or has lots of cracks, it may make more sense to cover it with a layer of 1/4″ drywall. Before you decide to do this, take a close look at how the added wall thickness affects the look of baseboards, crown-, door-, and window moldings, and so forth.
If your wallpaper is in good shape and well-adhered to the substrate, you may want to consider leaving it in place. Prime all surfaces with an oil-based primer (there are fast-drying primers such as Kilz), then use drywall tape and compound to cover and feather out the wallpaper seams. Prime the taped areas again, and you’re ready for painting.
]]>
A few months ago I posted a note about renting vs owning a truck. While reading on NYTimes.com today about vehicle rentals and the high cost of insurance, I was jolted into writing a reminder.
Unless your own insurance provides coverage, you become liable not only for any damage to the vehicle, but also for loss of the agency’s rental income while the vehicle is being repaired. The total can add up to well over $700 in seconds. You need to inspect the car or truck with a hawk’s eye for any dings, dents, or scratches before you drive off the lot. Make sure you look at everything, including bumpers and the roof, and point out problems to the sales person. In the morning many rentals are still wet with dew or countless drops of water from a fresh wash, making it extremely hard to detect dents and scratches. And these are dents you may be held accountable for upon return. What to do? I simply request a damage waiver. For much less than $15 per day, I can return a truck with dents, scratches, broken windows and more. Yes, you’ll be asked some quick questions so the clerk can complete a report, but that’s the end of the story. A story worth every penny, especially if you’re using the rental for work purposes.
]]>