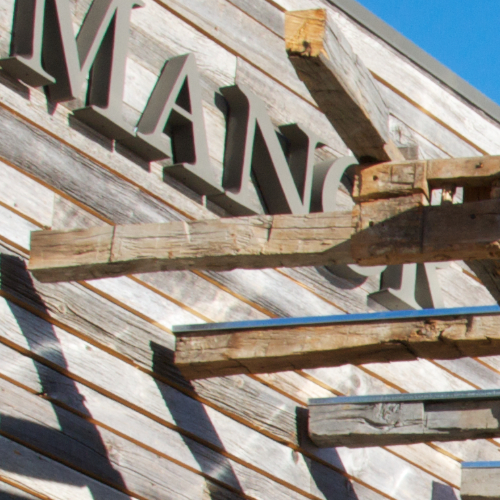
In a post published last year, I wrote about creative use of reclaimed wood. While most content on this site is about home remodeling, retail stores and other businesses can (and do!) the same.
A good example is a local branch of Port & Manor that opened in San Rafael, California, not long ago. Before the store opened to the public, the owners remodeled the front entrance. An overhead trellis was added, using all salvaged beams and boards. They added galvanized sheet metal caps to the top of most boards so they will not be affected by rain water that puddles and eventually causes rot.

Instead of using stucco to cover all the exterior wall surfaces, they covered some parts with horizontally placed, recycled boards. The store’s appearance essentially signals the products one can expect to find inside: vintage furniture, semi-antique decorations, and recycled items. What all their merchandise has in common is that they are made from sustainable materials. I like how this company added an attractive flair to the outside of their store. Good job, and smart communications!
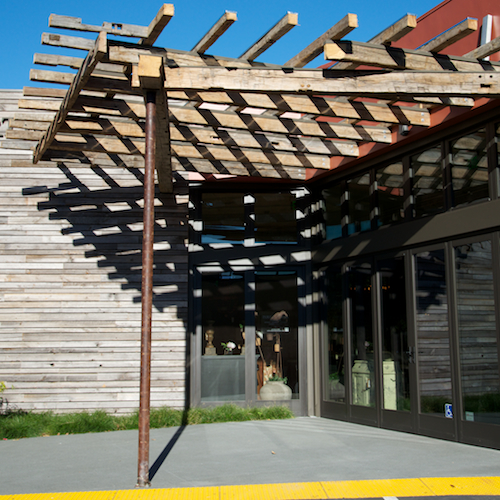
Salvaged wood at Port & Manor

Leave it to those Amsterdammers! Famous for their red light district, Old Dutch Masters, and gorgeous canal houses, one is now being built with a 3D printer.
A few weeks ago, Annemarie Coevert of the Dutch newspaper NRC Handelsblad reported how DUS architects designed the world’s first building being constructed with a 3D printer. Visitors can observe the printer, built by the same architecture firm, and nicknamed “de kamermaker” or “roombuilder.” Here continues a rough translation of the article:
The onsite construction trailer has blueprints on display (President Barack Obama visited the site last week), as well as scaled-down 3D versions of each of the house’s 13 rooms, available for purchase. While a Dutch building contractor as well as a German material’s supplier are involved in the construction process, more funding is needed to complete the canal house.
Although it has been decided that the building’s facade will be of similar design as the Cubist style used in Prague over a century ago, many construction details remain unknown. “3D printing is a totally different way of building,” explains Hedwig Heinsman from DUS architects. “Only the shape of the 3D canal house resembles a typical old canal house. For the rest it differs completely from a traditional building.”
According to DUS, the idea behind this project is to come up with new ways to construct buildings efficiently with recyclable materials. The 3D canal house should become a prototype for a building technique to be applied all over the world.
This is exciting! Yes, a great deal needs to be figured out, but the concept of new methods and sustainable materials is something we can not afford to ignore.
Learn more about the canal house.
]]>According to the architect’s web site, the design features a [550-foot] tower on one end of the block with two podium buildings and a row of townhouses filling the remainder of the block. The future construction site, located between First and Fremont Streets along Folsom, is on a parcel currently owned by the City of San Francisco.
City Insider also reports that the last time the City approved a Koolhaas design, it was for a Prada building near Union Square. Featuring 8,000 port holes instead of windows, critics compared the building to an oversized cheese grater. Holland > Gouda > cheese grater? That’s pretty chee_y. Yeah, you said it.
Take a look here to see a mock-up of the design.
Once construction gets underway, I will be sure to visit the site and publish an update.
]]>
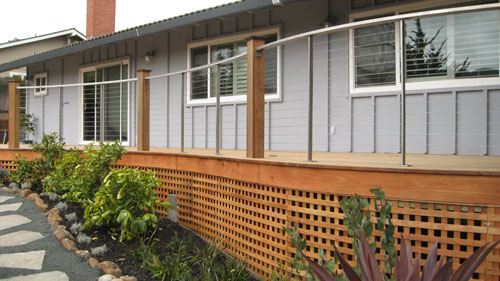
Summer is getting closer, and decks are wonderful places to spend time outdoors. We have built many of them, mostly using redwood or cedar, and sometimes using composite material or hardwood.
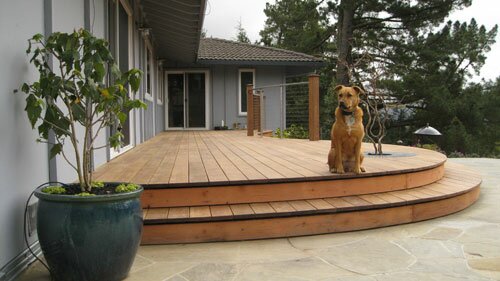
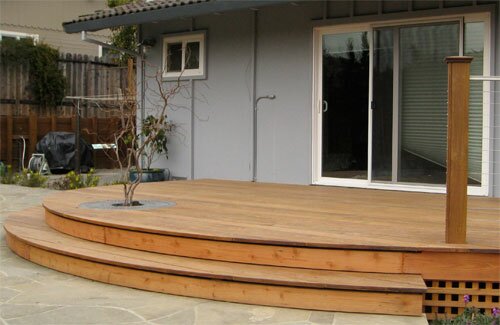
Just a few years ago, we crafted a curved ipe deck that became a true labor of love and one of our flagship projects. The structure underneath was made out of pressure-treated lumber (referred to in the trades as ‘PT’), and the decking material was 5/4″x6″ ipe. This deck is roughly 45 feet long and slightly over 12 feet wide at its widest point.
We will share the sequence of events of this project from start to finish, with as many juicy details as I can dust off, not to mention plenty of photos. Remodel Blog encourages comments and questions, as always.
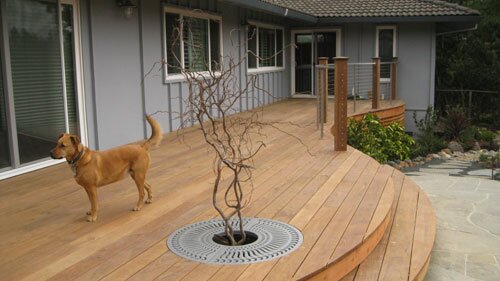
© CVAN Builders
Deck Design
Our clients had a team of professionals to tackle their project:
- A landscape designer who shaped the deck, flagstone patio, plants and irrigation;
- An architect who prepared drawings as part of the building permit application;
- Structural and soils engineers who provided footing and framing details;
- My company’s crew of carpenters, electricians and plumbers; and
- A landscape contractor

© CVAN Builders
During the deck design phase, the owners were quite busy deciding on many details, including what kind of decking material to use. There are a huge number of composite materials available, but most of them have ugly side effects that do not become visible until later. Fading colors, incompatibility with certain plastics and rubbers (outdoor furniture, plant pots, and garden hoses), mold, and deformation are just a few examples. If you are interested in a composite deck, make sure you do your homework and check it twice.
Ipe Decking
In the end, the clients decided on 5/4” (meaning a full one inch thick) Iron Woods ipe. Iron Woods ipe is a particular ‘brand’ of ipe that received high ratings from Consumer Reports magazine. Also known as Brazilian walnut, this is an extremely dense material, fire-resistant, very heavy, and at times challenging to work with. Ipe requires special preparation and installation methods, and definitely takes more time to install than softwoods such as cedar or redwood.
Deck framing, Lay-out & Elevations
© CVAN Builders
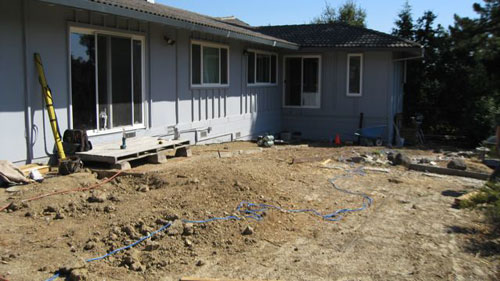
After receiving the building permit, it was time to get to work. The owners had already cleared away old brush and a tree. The first thing we did was to establish elevations with laser levels, lay out the framing structure and related footings. There was an existing foundation from an old deck that had been torn down a long time ago. We wanted our new lay-out to bypass this, so we could simply leave it in the ground rather than wasting time with jackhammers to remove it. The photo below shows several footing excavations, as well as a utility trench in the foreground. We buried a new water line in this one, and electrical and more water lines in another.

© CVAN Builders
Concrete Footings
When considering footings, we don’t recommend the use of so-called ‘pier blocks’ as structural supports. They are not as substantial as steel-reinforced concrete, and lack strength and connectors that improve your deck’s integrity in case of an earthquake. This may not be a problem in your area, but in and around San Francisco we have to take this condition quite seriously.
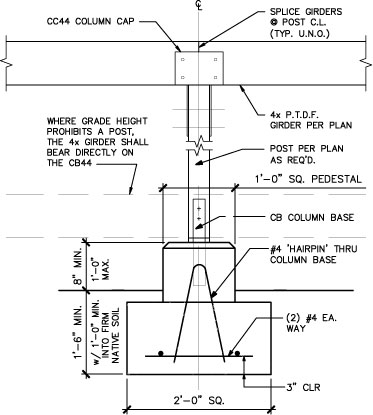
Used with permission © Andersson Woodrow
The engineering specs called for 24″x24″x24″ footings. The pedestal of the footings had to be a minimum of 8″ above grade, making them at least 24 inches tall.
When you build forms, make sure you will be able to remove them later. Building inspectors rarely allow wood forms to be left in the ground, nor would you want to.
Consider coating the inside of the forms with form oil. This will make them easier to remove once the concrete has set. Use care not to get oil on rebar, as that will prevent concrete from sticking to the steel.
There also was a specific rebar design; see drawing detail. Generally all rebar and hardware connectors have to be in place prior to inspection. So-called ‘wet-set’ installation — when brackets etc are set at the same time concrete is poured — is generally not allowed. Depending on your specific design, rebar is often required to be connected to whatever hardware that’s called for, and a ‘wet-set’ procedure makes that very difficult if not impossible.
Please keep in mind that this footing spec was created specifically for the location and conditions of our job site. On some projects this design will be overkill, while on others it may be insufficient.
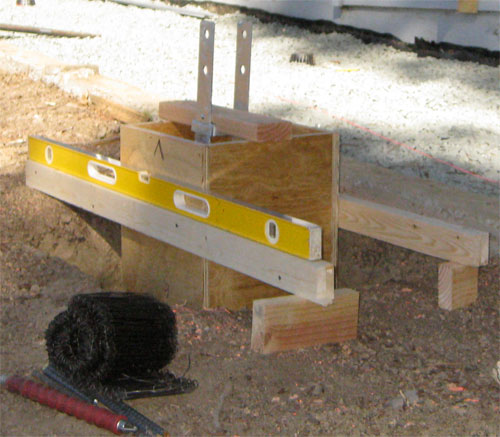
© CVAN Builders
Steel stakes were added later to keep form from moving. There was a fair amount of concrete to be poured, and we decided against trying to mix it onsite. Instead we arranged for a cement truck and a concrete pumping contractor to fill the excavated footings. We like using a vibrator to get rid of any air pockets in the cement. Be careful to not vibrate the cement too long or all the gravel will sink to the bottom.
When calculating how much concrete you will need, add roughly 10% extra to the total you come up with. This is because:
- During excavation the holes often become larger than you intended;
- Sometimes small cave-ins occur, requiring additional concrete;
- A lot of concrete will stay in the pump truck’s hose;
- Concrete is cheap. Why take the risk of coming up short?
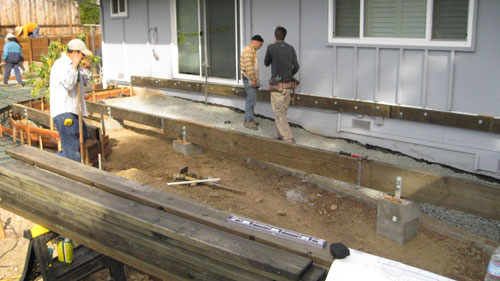
There are some handy concrete calculators to be found online, but double-check the math to make sure it’s right. The day after the pour we stripped the forms and started installing 4×12 beams, plus the ledger board that’s bolted against the wall.
Deck Framing
As an aside, we prefer to build decks to be free-standing; i.e., without being physically connected to the house. That’s not always practical, and it means more footings. When a ledger is installed against a house, as it was in this case, make sure you use spacers (see Resources below) between the back of that board and whatever kind of surface it will be bolted against. These spacers greatly reduce the chances of rot and decay. Using galvanized sheet metal (GSM) ‘Z’ flashing that tucks under the siding’s moisture barrier and sits on top of the ledger board is an excellent idea. Use only galvanized thru-bolts (as opposed to lag screws) with beefy washers to attach the ledger board. If your engineer allows lag screws, first drill pilot holes and fill them with silicone-based caulk. This will help prevent moisture from entering the framing. The engineer called for specific blocking, hardware, and methods to fastening the ledger to the existing framing.
© CVAN Builders
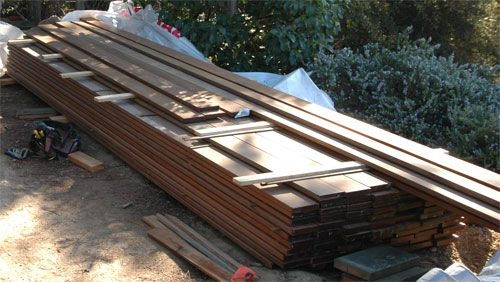
In the meantime, Economy Lumber’s truck showed up with the ipe delivery. We found a place where it would not be in blasting sun each day, and we made sure to use stickers in between each layer. These thin pieces of wood create a space between each layer of boards, allowing air circulation and giving ipe a chance to acclimate. This is an important step, so don’t skip it and allow at least five days for this process.
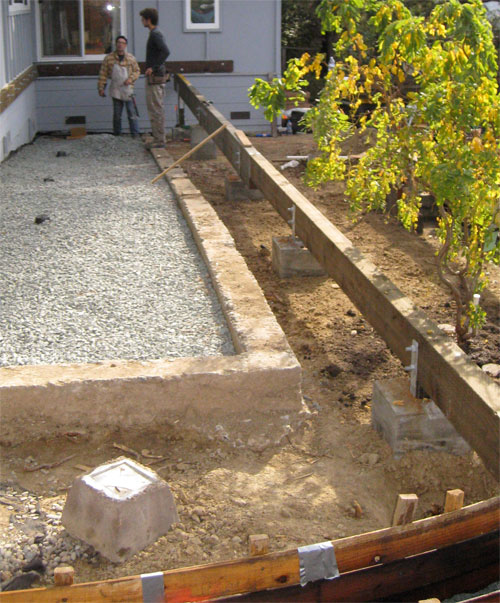
To prevent weeds from growing under the deck, the grade was covered with landscape fabric, followed by about three inches of gravel. A small tree was planned in the deck area, so pipes for irrigation and conduit for lighting were installed before we proceeded with installing deck joists. The owners also had an underground drainage system installed.
Placing Deck Joists
The joists were installed at 16″ OC (on center). Because the ipe boards were a full one inch thick we technically could have installed framing at 24″ OC, but to keep the decking as strong and stable as possible, we opted for a tighter span. Remember that when you frame with PT lumber you must use galvanized nails and hardware. The chemicals used to treat this lumber are quite corrosive, so regular steel would not last long. Remember, too, to treat all cut ends of this lumber with a preservative such as Copper Green. As an aside, not all framing hardware is available as galvanized. In those case we typically create a barrier between the hardware and lumber with a piece of bitumen tape. Details, details…
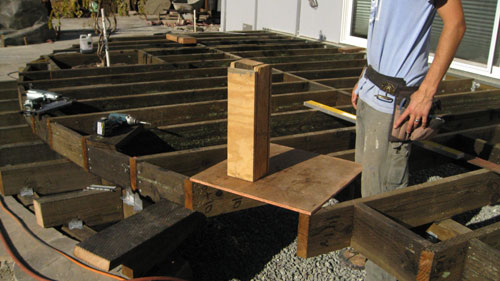
In the photo above, Josh helps to figure out placement of the railing posts. A cable system will be installed between them, and due to huge stress placed on the posts we want to make sure the posts are anchored to the framing as well as possible.
One other thing about PT you should be aware of is that it is sold in different colors using different preservatives. Read more about the fine details here.

To make the framing lumber last as long as possible, we added bitumen tape to the top of the joists, prior to installing the deck boards. Typically the gaps between them collect dirt as time goes by. Then the dirt gets wet during the winter, or when plants are watered or the deck is hosed off, leaving an almost constant humid collection of dirt. Over time this will begin to rot the framing, even the PT kind. Self-sealing bitumen tape, such as Grace Vycor, is relatively inexpensive and easy to apply.
Once all the blocking and joists are in, it is time to call the building inspector and get the framing segment approved and signed off.

Installing Deck Boards
The ends of ipe boards have a tendency to check, so it is recommended to immediately seal every end after it has been cut. We used a gel called AnchorSeal. Initially there were conversations with the client about possibly using a hidden fastener system, but nearly every reputable ipe supplier recommended using face screws at 16” o.c. to prevent cupping. There was not much difficulty with warped or twisted boards, and the usual ‘board bender’ tools worked fine.
Using Stainless Steel Screws For Your Ipe Deck
To keep the boards from cupping, it was widely suggested to use two screws at 16” OC. The clients were not fond of the idea that all those screw heads would remain visible, so they asked that they be covered up with ipe plugs. While we always pre-drill screw holes — even in softwoods — this is doubly important with ipe. We installed over 1,800 stainless steel screws; stainless because this does not interact with the corrosive chemicals found in pressure treated lumber. Of course we also had to counter-sink the screw heads so there would be room for the ipe plugs.
Ipe Plugs
At first we thought about making our own plugs, but ipe is so hard this would probably take days, not to mention we’d burn through countless bits. I found a web site with reasonable prices, and before long a shipment arrived. The next question was how to keep the plugs in place. Nick suggested Titebond 3, applied with a Q-tip to the inside wall of the counter-sunk hole. If applied to the outside of the plug, most glue would get removed while inserting the plug into the board and leave glue on top of the deck board.
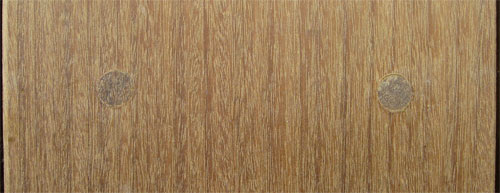
After inserting all 1,803 ipe plugs (I’m mentioning that number only for dramatic effect; it actually went faster than anticipated), we came back the next day with sharp chisels and trimmed all that stuck out above the deck board surface. Later we checked the entire deck and sanded where necessary.
Deck Ventilation
As you’ve probably read or heard, you want good ventilation under your deck. The right side of our deck sits nearly 4 feet above the ground, and with the installation of trellis material, adequate air movement is not an issue. However, on the left side of the deck there’s little room under the step. To encourage air flow, we left a ¾” gap between the bottom of each step and the top of the riser. It looks just like a shadow line and is not as visually obvious as one might think. You can also paint the step or stair framing black to minimize its visibility. A gap was also left between the flagstone and riser mostly to prevent the riser from wicking water, and as an added bonus this gap helps with air circulation as well.
Curved Riser
Clearly ipe is too hard and dense to bend. While I’ve read few articles from carpenters who cut boards to create 1/4″ x 7″ strips that could be bent and glued to 2 additional strips to create a 3/4″ riser, this seemed not easy to do. For one thing, running ipe through a table saw in that manner must’ve left many saw blades smoking! We decided to buy several nearly clear 2x redwood boards, and milled those to the dimensions mentioned above. The first two layers were stapled and glued to the riser framing, and the last layer was glued, clamped, and received a few finish nails at joints. The color of the redwood complements that of the ipe, even when they age.
Railing Posts
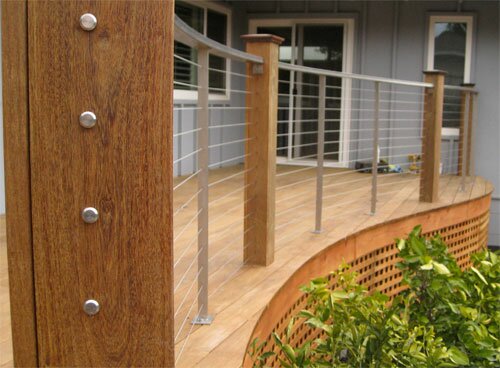
The railing posts were pressured-treated 4x4s bolted as well as possible to joists and blocks. We then covered all four sides with ipe and installed deck boards around them. This looks far better than butting deck boards up against the 4×4 and setting the vertical post wrap boards on top of the deck boards. We used a combination of galvanized finish nails and stainless steel trim head screws to assemble the posts.
Curved Stainless Steel Railing
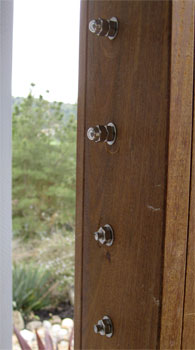
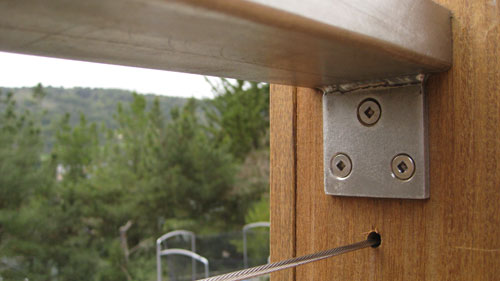
The railing and ‘interim’ steel posts were custom-made. The manufacturer supplied us with a steel template for the holes that had to be drilled in the wood posts. The cables were a challenge. We used a rigid wire to come up with a total length for each cable, and took that to the cable company. They fastened terminators at each end, and supplied us with nuts etc. Because building code requires that spacing can not be less than 4 inches between each cable, they had to be installed very tightly to minimize any slack.
The threaded terminators were located between the first post and the house, leaving very little room for tools and adjustments. Tightening the nuts was not always easy as some of the cables would start turning right along. While it was tempting to put a Vice Grip type of pliers on the cable, it would be easy to damage it. In the end the pliers were installed at the very end of the threaded terminators, taking care to preserve the threads so finish nuts could be installed. Installing these cables was a great opportunity to practice ‘being Zen’ at work!
Resources
- Iron Woods ipe
- Decking materials review by Consumer Reports
- Deck-To-Wall spacers
- Deck construction by CVAN Builders
- Hardscape, landscape, and deck design by Leigh Designs
- Architecture by RS Donahue Architect
- Engineering by Andersson Woodrow, Fairfax, CA
- Special inspection by Dave Olnes PE Inc., Oakland, CA
See also our post on Second Story Deck Construction
Note: This article was first published on April 11, 2012. Due to a malware attack on our servers in 2013, a few posts were lost including this one. As there was no back-up available at that time, we have now reconstructed and republished this article. You may be able to view the original version by visiting the WayBackMachine and entering Remodelblog.net in the search box.
This post, including all text, photographs, and drawing, are protected by U.S. copyright laws. Please ask for permission before using all or parts of this post.
]]>
This marriage does not come as a surprise. Combine the aesthetic and engineering skills of former Apple employees with the capital resources and never ending hunger for data, and both parties say “I do.” At $3.2 billion and a need for more capital, Nest was hard-pressed to object.
Some time ago, Remodel Blog posted a successful video on how to install the Nest Learning Thermostat. Recently, Nest Labs debuted its Nest Protect smoke detector. As you can imagine, with wifi and internet connectivity, it offers far more than just an alarm signal when it senses smoke.
As written elsewhere, Google will now be able to detect at exactly what time furnaces and cooling systems are switched on and off; how often; and when occupants put the unit in “away” mode. Without looking too far, I see Google making money off energy conservation contractors looking to connect with homeowners whose houses use more energy than normal. I can see Google offering a connection to Nest Protect to burglar alarm companies, which can use Nest thermostats or smoke alarms as extensions of their own systems. The data-mining possibilities are extensive and potentially valuable. Whether or not the public will go along with this is a different question, and one that will become known over time.
As a fan of Nest products, I will now look at its future products with a healthy dose of suspicion. Installing a new Nest device in my home or office will mean it does not come alone. Google and its many Ph.D’s will come along, too. I am not sure my home is large enough.
]]>
Last September, I visited Tassajara Zenshinji and hot springs, located in California’s Carmel Valley. After a scenic but bumpy ride — it takes roughly 90 minutes to cover 14 miles — my friend and I arrived at the Center. We spent some time familiarizing ourselves with our surroundings, and it was easy to become seduced by the simple yet elegant designs and choice of building materials.

Tassajara’s main entrance, under construction at the time of my visit, built primarily out of fir.

I love the joinery, and I was particularly interested in the connection between the post ends and the rocks they sit upon. The ends are sculpted to follow the contour of the rocks, but they did not appear to be fastened to the rocks in any way (by means of steel rods and epoxy, for example.) I also could not find any connections between the rocks and possible underground footings, making me wonder about earthquake safety.

If you have knowledge of rough carpentry or structural engineering, you will notice that some of the cut-outs are too deep. Assuming the new roof will be similar to other roofs at Tassajara, I do not foresee any issues. Heavy clay tiles, on the other hand, do require substantial support, especially in areas prone to earthquakes.

Shown below is the entrance to showers, changing rooms, and hot springs. Straw privacy screens
are visible on the left. The facilities have separate entrances for men and women. The springs are co-ed at specified times.

Notice the bottoms and ends of rafter tails. Someone thought it a good idea to seal them, but used white paint instead of a clear sealer. Use of the latter would have preserved the wood’s natural beauty and aesthetic.

The elevated roof over the door, often seen in Chinese and Japanese designs, allows not only light, space, and airflow, but also lends an ethereal feel to the passage.

Vertical, overlapping siding boards have a rustic look, and so does the straw-covered fence. Actually, the straw has thin horizontal strips of redwood underneath, providing greater privacy and increased strength. At my home there was a prefab straw ‘mat’ (about 6 feet tall) placed to disguise a well pump. Because there was no framing behind it to offer support, it eventually fell apart. I do like the look of it.

A different kind of privacy screen, made with bamboo uprights and thin batten boards.

The potential for fire is high. A dry climate plus the extensive use of kerosene lamps calls for caution. Surely the swimming pool doubles as a useful resource for fighting fires.

Plenty of light and the beauty of wood, without any noticeable hardware, make this newly constructed
bathroom quite appealing.

The coat hooks were made of a tree branch.

It is close to the yoga building, shown below.

The perfect place for a cup of coffee early in the morning.

Here is an outdoor kitchen counter with a sink, coffee machines, and plenty of tea. This is where guests would gather before the dining hall opened for daily meals. Here, too, the simplicity, functionality and general sweetness of design makes it very appealing. I am wondering what this setting looks like (and how it functions) during winter months.
Some shelves on the left side allow for display of china.

The entrance gate to the swimming pool was built as if it was furniture. Exquisitely crafted, the choice
of high quality lumber and hardware made it a joy to use.


The dining hall. Notice how the headers above the ground floor windows are curved at the top, while those
above doors are straight. I always love the mixture of rocks (lower wall) and vertical wooden boards.

The table with red table cloth would collect the guests’ napkins (plus rings labeled with last names) after each meal. Before the next meal Tassajara’s kitchen staff would rearrange them to appear in alphabetical order.

Another example of joinery.
Copper gutters, downspouts, and a leader head.

Logs sculpted into seating

I hope that these photos and descriptions are inspirational, and that they motivate you to visit Tassajara. The Center is open to guests several months during the summer, and there are work/study programs available. Below is Tassajara’s contact information as well as several external links to more information about its history and design.
Tassajara Zen Mountain Center
39171 Tassajara Road
Carmel Valley, CA 93924
(415) 865-1899
http://www.sfzc.org/tassajara/
Other links:
- Tassajara Zen Mountain Center’s guest season opens (sfgate.com)
- Architect carves niche in ‘spiritual design‘ (sfgate.com)
- The Stunning, Sacred Retreats of California (nytimes.com)
- DeSmidt Builders
- Jacobson Silverstein Winslow / Degenhardt Architects
- Mui Ho Architect
]]>

One of my desk tops is actually a solid core door. It spans across two filing cabinets, making for a nice, long work surface. The top has an attractive birch veneer skin which I never bothered to seal. I figured I would get around to it some day, and that day finally arrived. In addition, because the door is just 1-3/8″ thick, I was afraid it might sag in the middle. Given that I had to clear everything off my desk anyway, I decided to add some reinforcement underneath.
Choosing A Finish
My friend Nick Probst, a cabinetmaker in Oakland, CA, recommended an oil-urethane product called Arm-R-Seal. Made by General Finishes, it has an excellent reputation for yielding a beautiful, long-lasting topcoat.
Surface Preparation
I started by sanding all surfaces with 120 grit sandpaper, followed by another sanding with 220 paper. Since it was a fairly large surface, I used an orbital sander. After carefully wiping off all the dust, I rubbed on the first coat of Arm-R-Seal. You can see in the photo below how it definitely darkens the wood, but it also brings out the grain quite nicely.

Rather than having to breathe fumes in my house, I put the door on two sawhorses in my yard. The first coat was completed in the late afternoon, and by early evening I covered it with a clean tarp. The birch veneer was porous enough that it readily absorbed the first coat. The next morning I rubbed that coat with 0000 steelwool, followed by a second rub-down with Arm-R-Seal, satin finish. Here is what the birch veneer looks like after four coats, each with a successive ‘rubs’ of steel wool.

Easy As Pie
I stopped after seven coats. I was thinking of maybe going for ten, but I really needed my desk back and was about to take a trip. It takes hardly any time at all; just a little elbow grease. After almost every coat I waited for perhaps two hours, and then covered it with a tarp. There were squirrels messing around in a tree above, and I really did not want anything dropping on the drying finish. An oscillating fan helped speed up the drying process. You will notice that after so many coats of Arm-R-Seal plus the steelwool treatments the surface is super smooth — almost slippery.

Adding An Aluminum Strongback
Even after several years of use, the door was still as straight as could be. Still, I opted to add a 48″ piece of aluminum angle iron to prevent any kind of distortion. I used a jigsaw to ease the sharp corners. It is important to install plenty of strong screws, and not the ones used for drywall, as they can break. Make them plenty long so they get a good bite. Most of these doors have particle board centers, which have far less integrity than solid wood. If you look carefully at the photo below, you will notice that the angle iron does not sit centered between the left and right edges. I installed it slightly further toward the left, which is the rear edge of the desk. This was done to prevent scraping my knees.

By the way, I moved the door indoors and applied the last coat just before leaving on a 5-day trip. I cracked a few windows, and when I returned the urethane odor was entirely gone. Have fun with your refinishing project, and feel free to ask any questions, as always!
]]>

That is the title of a recent article in The New York Times that caught my eye. I interact with architects and engineers on most projects my company is hired for, so I have first-hand experience with the benefits and sometimes disappointments of working with design pros.
I believe it comes down to just a few factors:
- How substantial is your project?
- How large is your budget? Can you afford loss?
- How much time do you have?
- Hiring pros does not have to be an all-or-nothing proposition.
Project size
Something relatively simple such as a deck can be designed and built by do-it-yourselfers. There are many good books on the topic, and I like to think that most municipal building departments are willing to give helpful pointers. On the other hand, a second story addition or structural upgrades are better left to professionals. Not that clients should not take active roles in their projects, but without the necessary experience these jobs can become extremely frustrating, time-consuming, and expensive.
Budget
With some exceptions, people with sufficient income are likely to hire an architect and contractor . Generally those who want to save as much as possible — and those who simply enjoy the process — will don protective attire and tackle home improvement themselves. Keep in mind that post people undertake a major remodel just once or twice in their lifetimes. And the way they learn is by making mistakes. Unfortunately, making mistakes in construction — be it design or actual building — can be very costly. Yes, good architects and conscientious builders do not come cheap. However, not only can they can save you major headaches and help protect your largest investment, they are likely to deliver a product you will be happy with.
Time
If you are able and motivated to do thorough research on your project, you can save plenty. Supply your own plumbing fixtures, for example, and you can probably do much better than your plumber. Just a few years ago, I bought a kitchen faucet that retails for $700, including a contractor’s discount. With some crafty research, I was lucky enough to pick one up from an interior designer’s overstock for just $200. Keep in mind, though, that you must make sure all the parts are in the box. If your plumber, at $100+ per hour, is at your house to install, and finds pieces missing or incorrect, your savings will disappear quickly.
Disappointments
Similar to some contractors who just do not measure up, some architects and engineers are sub-par. I was asked recently to submit a competitive bid for custom work with lots of details. Unfortunately, the drawings did not address important structural connections. Many aesthetic features were made to look pretty on paper, but precisely how they were supposed to be manifested left me scratching my head. Even more curious was the fact that a building permit had already been issued, even with the missing structural information. And then there are designers who do not really know what a project is going to cost. Eager for new business, they tell prospective clients what they hope to hear. Then later, when contractors’ bids reveal that the work is going to cost far beyond the clients’ budgets, plenty of frustration and anger bubbles to the surface.
All-or-nothing?
I am in favor of the middle way. As mentioned, some jobs need to be handled by construction professionals, period. They know building code requirements and have the skills; you do not. While building department officials may be helpful, they will not take the time to go over all your projects’ details. So why not do as much as you can, with or without the aid of design software, and then consult with an architect for a few hours to review your work and make suggestions? Especially in this down economy, I bet many some pros are interested in offering such a service.
I would love to hear from people who have designed and/or made improvements on their own. What was your experience? What would you have done differently? It surprises me that the NYT article did not ask this question and opened up its ‘Comments’ section. There would have been so much material for readers to learn from.
Consultation
My company, CVAN Builders, offers consulting services to those who wish undertake larger alterations. The earlier we are involved in the project, the better we can help solve problems. We can help plan the entire process, identify and navigate possible roadblocks, and put together an approximate timeline and course of action. Depending on the extent of our involvement, we can make periodic site visits to make sure the work progresses as agreed. In hindsight of projects where problems arose, almost all clients said they would happily have paid for consultations. It was only after they learned first-hand about the many details inherent to remodeling that they came to understand the value of consultations.
Prior to construction, we often hear “I have an architect, contractor, soils + structural engineers; and a city inspector. Why should I spend additional money on a consultant?” The answer is that all these professionals cover narrowly defined tasks, and there usually are countless important details that fall through the cracks. In addition, the folks you hired are not necessarily in your corner all the time. Particularly in fixed-price situations, they want to get in and out as quickly as possible. Building inspectors look strictly for compliance to codes and engineering specs, and not for adherence to aesthetic details or the brand of paint shown in contracts and drawings. Please get in touch via CVAN Builders’ web site if you want to know more.
Many years ago, a local cabinet shop published a joke book for fellow contractors. It featured a cartoon of the leaning Tower of Pisa. An architect with construction drawings under his arm knelt in front of the King. “Sire, this will cost 30,000 lire to build. However, we can save at least 2,000 if we do not hire a soil engineer.” And interesting to know that the name ‘Pisa’ comes from ‘marshy land.’
]]>